

How To Draw A Pyramid Shape
How to depict a pyramid with a stone blueprint in 3D view
Learn how to draw a pyramid with a simple step by step tutorial. First, you will learn how to construct the 3D pyramid shape, then how to overlay a squeamish stone blueprint to stop with a perfect, Egyptian-mode pyramid.

In the commencement part of the tutorial, you will learn how to construct the 3-dimensional pyramid shape - drawing the base square in perspective and finding the vertical centreline for a perfect pyramid shape.
Once you lot know how to describe the pyramid shape, the next tricky part is to lay down a nice blueprint of overlapping stones to complete the pyramid. We lay down a uncomplicated filigree that will assist us hands depict nice, overlapping stones.
pencil
,
eraser
,
color pencils
cartoon paper
or
sketch volume
Love drawing? Never miss a tutorial!
How to describe a pyramid: 3D construction
Stride one : Draw a foursquare in perspective

Allow's draw the base for our pyramid beginning. This is the square drawn in simple perspective - ii parallel lines horizontal lines, joined by two parallel vertical sides at around a 45-degree bending.
Step 2 : Mark the centreline of the pyramid

Now nosotros need to describe the vertical centreline for the pyramid. Commencement, allow's find the middle of our square base. Draw the ii diagonals - where they cross is the center of the pyramid base of operations. And then draw the centreline direct up from the base of operations eye.
Step three : Draw the outer edges of the pyramid

The final step is simply to join the top of the pyramid to each of the corners. And since the top-left edge is hidden behind the front side of the pyramid, all we need is three lines to draw the pyramid sides.
Similar this tutorial? Share it with others:

How to draw a pyramid: base sketch step by pace
Stride 1 : Base pyramid shape in 3D perspective
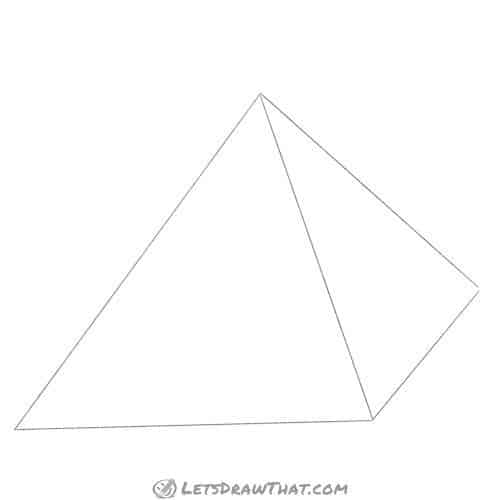
Hither is the simplified pyramid shape from the previous construction exercise later we take erased all the construction lines. All you lot can see is the front triangle and one side.
Footstep 2 : Divide the pyramid horizontally

Since pyramids are built from layer after layer of stones, let's divide the shape into individual cubes. Kickoff past marking the front confront - divide it by cartoon horizontal lines. Notice we are cartoon the lines with a broad gap at the bottom, and the lines are getting closer together as nosotros motility up to the narrower top of the pyramid.
Footstep 3 : Describe the horizontal lines on the side face

Next, divide the side face of the pyramid. Draw lines parallel to the base of operations of the pyramid, each starting where your front end dividers encounter the edge.
Stride 4 : Draw the vertical lines on the pyramid
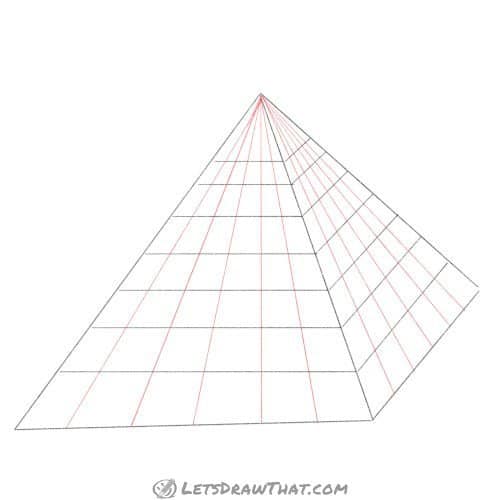
Next, mark the vertical lines to carve up the pyramid into square stones. Divide the base with small-scale marks into an even number of equal parts - we take five markers dividing the width of the pyramid into six equal parts. Then join each of the markers to the top of the pyramid. Separate the other side of the pyramid in the aforementioned way.
Footstep 5 : Draw the entry door

Now, this is certainly an option that you lot can get out out if y'all just desire a simple drawing, but nosotros thought the pyramid is a fleck bare and decided to requite it an entry arch. Draw a rectangle in the eye of the baseline. And so draw the one-half-oval entry on information technology. Now for the tricky part, drawing all the sides of the entry portal in perspective: the short lines from the front face of the gate to the pyramid wall are parallel with the base of operations of the right face of the pyramid. On the correct side of the portal, the line from the bottom to the top back corner points up to the superlative of the pyramid - the same as our dividing lines in the previous step.
How to draw a pyramid: outline the cartoon step past stride
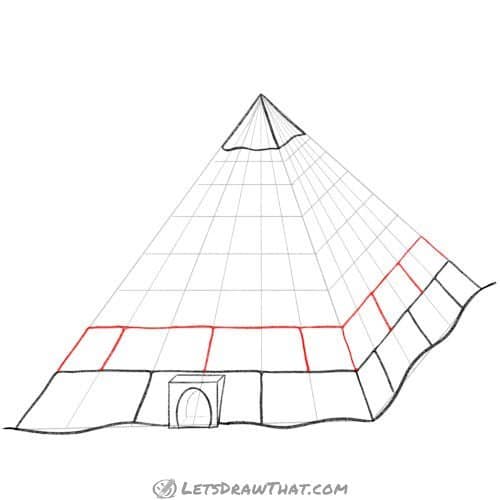
Step 1: Outline the pyramid gate and the elevation cap

It is fourth dimension to start outlining our pyramid. Start with the simple outline of the gate portal - simply a straight outline of the sketch. Then outline the base of the pyramid. Since our pyramid is standing in the sand dunes, draw the baselines with a wavy line. Similarly, outline the height of the pyramid, but give it some rugged wavy bottom edges, as the outer casing is worn over time, equally seen on this pic of the Great Pyramid of Giza.
Step 2: Describe the first layer of stone blocks

Permit's offset building the layers of stones that brand the pyramid. On the front end face, draw the stone outlines as wide rectangles across 2 of the sketch segments - so nosotros get three large stones out of our six segments. On the side, start with merely one segment - this would be the side of the corner block. Then depict ii double-wide stones, finishing with a narrow unmarried-segment one for the rear cake.
Footstep 3: Add together second layer of stone blocks
Now add the 2nd layer of the blocks. As nosotros want a nice overlapping brick pattern, reverse the method from the previous footstep. Start with but a single segment, followed past two doubles and a single at the finish for the front face. Swap around to three double-width stones on the side face.
Footstep 4: Complete the stone patern for the remaining layers
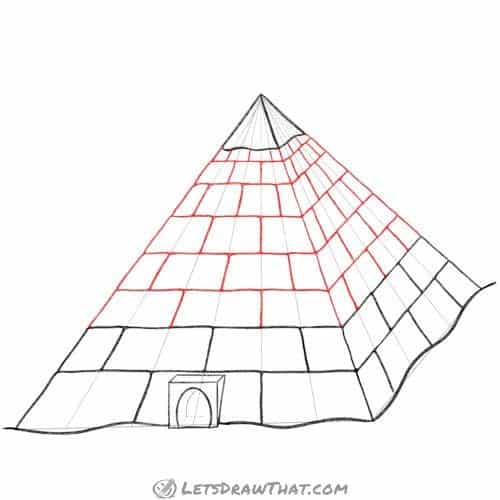
At present that you have learned how to draw the overlapping rock design, complete the remaining layers of the pyramid in the same way. If yous desire your pyramid to look more realistic, with a more interesting design, rather than drawing out just the directly dividing lines, outline each stone block individually with slightly rounded corners.
How to depict a pyramid: finished drawing
How to draw a pyramid: finished outline cartoon

Here is the completed pyramid outline with the sketch lines erased. Here you lot can better see how outlining the individual stones gives our drawing a scrap of irregularity and a more than natural look.
How to depict a pyramid: finished drawing coloured-in

Now that yous know how to depict a pyramid, all that is left is to color in the drawing. Pyramids are unremarkably congenital from sandstone - and so here nosotros are using shades of yellow, ochre and light chocolate-brown to color the pyramid and give information technology some texture. Of form, pyramids stand up in the middle of sand dunes - drawn as few simple overlapping arcs, and coloured in with the same sandy colours. Some hot Egyptian sun and a suggestion of a camel caravan in the distance are optional extras to complete the desert scene.
Like this tutorial? Share it with others:
Love drawing? Never miss a tutorial!
Get notified when there is a new tutorial published on Let's Draw That! (2-four times a month)
Check out the latest tutorials:
Like this? Share the fun with others:


Source: https://letsdrawthat.com/how-to-draw-a-pyramid/
Posted by: lenoxnembee.blogspot.com
0 Response to "How To Draw A Pyramid Shape"
Post a Comment